Table of Contents
Spline Edit (Layout Tool) - Basic Use
This Layout Tool is the heart of the Spline Toolkit. It allows you to edit splines that are attached to Spline Primitive.
The tools is available in the db&w Tools menu config that's shipped with the db&w Tools, but can also be mapped to a shortcut or added to a menu elsewhere.
A Spline Primitive needs to be selected when activating it.
While the tool supports multiple viewports, interaction may only take place in one, active viewport. This is marked by a green frame around it.
For ease of access, there are three ways to get at the tools provided by the Spline Edit tool:
- Panel The panel is opened by pressing the 'n' key.
- Viewport Menu This menu is visible at the top left of the active viewport. It may be turned off from the panel.
- Right Click Menu Right clicking in a viewport opens a pop-up menu making some of the options available.
Since the controls are mostly identical across the different ways of access, we'll be showing the controls for the panel which makes all of them available.
Controls
Spline Open / Close
Turns the spline into an open or closed curve.
Edit Mode
- Edit This is the normal editing mode. You can select knots and edit them but not create new knots by clicking on the viewport.
- Edit & Append This mode will append new knots at the end of the spline if you click on an empty part of the viewport (not selecting an empty knot). This is the default editing mode when the tool is activated on a spline with zero or one knots.
Previous Knot / Next Knot
Select the previous/next knot, wrapping around if necessary.
Edit
Automatic Smoothing
This turns on automatic smoothing for a knot. It can either be smooth or linear. Enabling any of the automatic options disables access to the control points, as these are computed automatically now.
Make Smooth / Make Linear
If the current knot is set to automatic, clicking on either button will set it to automatic smoothing or automatic linear.
If smoothing is not automatic for the current knot, then these buttons will make the knot smoothed or linear by adjusting the control points.
Insert Before / Insert After
Adds a new knot before or after the current knot. The new knot will be positioned half way between the current and the previous/next knot and the control points will be interpolated.
Delete Knot
Deletes the currently selected knot.
Link Control Points
If this is enabled, moving one control point will move the other control point of the knot in the opposite direction.
Control Point Editing / CP:
This defines what happens when directly moving a control point (by clicking on the small circle, not the Axis or Planar handles).
All of these modes also move the other control point if Link Control Points is enabled.
- Free Move The control point can be moved freely in all three dimensions.
- Length Only Only the distance of the control point to the knot is changed, the direction remains.
- Angle Only Only the direction of the control point to the knot is changed, the distance remains.
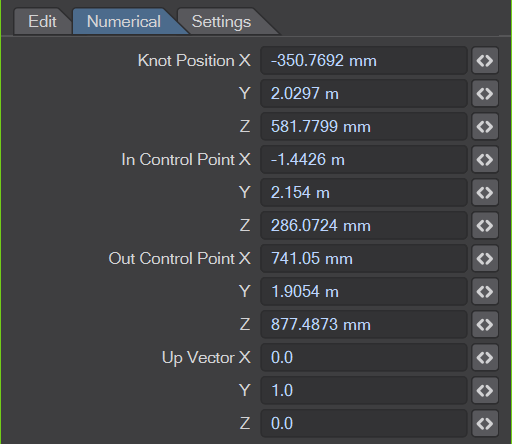
Numerical
Knot Position
The position of the current knot which may be edited as well.
In Control Point
The position of the current in control point which may be edited as well.
Out Control Point
The position of the current out control point which may be edited as well.
Up Vector
The Up Vector is used to align items along the spline.
While the direction of the spline is defined by the spline itself, an item could be banked any way around it.
The up vector defines the direction that is considered to be upwards at a specific knot. This value is interpolated from one knot to the next as an item moves along a spline.
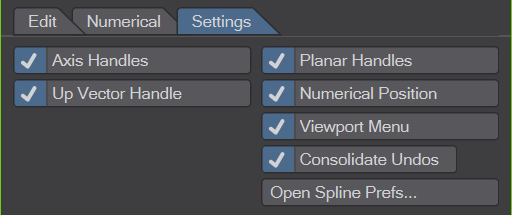
Settings
Axis Handles
Toggles the display of the axis handles for knots and control points.
Planar Handles
Up Vector Handle
Toggles the display of the up vector handle for knots.
Numerical Position
Toggles the numerical display of the distance to the origin when moving a knot or control point.
Viewport Menu
Toggles the display of the viewport menu.
Consolidate Undos
This changes how the undo system works. By default, actions are consolidated. Basically, multiple edits of the same type to the same item are stored as one undo step.
For example, if you move a specific knot multiple times in a row, say to tweak it, then all of the moves will be consolidated to a single un^do step if this option is enabled. If this option is disabled then every single small move of that knot will be a separate undo step.
Open Spline Prefs...
Open the Spline Preferences
Handles
When selected, a knot will provide multiple handles to edit the knot, the control points as well as the twist angle for the knot. Some of these may be turned off in the tool panel, Display tab, if they clutter the viewport.
Position
Position handles are displayed as circles around the knots as well as the control points of the currently selected knot. The in and out control points have different colours, depending on the Spline Preferences.
They can be selected and dragged in all three dimensions, depending on the viewport.
Axis
Axis handles are coloured arrows pointing along the major three axis in local space. They are shown for the selected knot and control points.
Selecting and dragging them restricts the movement to that axis only.
Planar
Planar handles are coloured, dashed rectangles aligned to the main three planes in local space. They are shown for the selected knot and control points.
Selecting and dragging them restricts the movement to that plane only.
Up Vector
The up vector handle is a small circle and a dashed line to the selected knot, rendered in green.
It can be selected and moved in all three dimensions. Since there's no axis or planar handles (yet), that may require changing the viewing angle to get into the desired position.
Known Issues
- Switching the tool from one viewport to another can be glitchy at times. We tried to keep it safe so it requires a click on the new viewport to make the handles active again.


