Table of Contents
Buffers
This section of the interface allows you to individually select and edit buffers for exporting. The section above the dividing line allows you to select the available buffers. The section below the dividing line contains the individual settings for the selected buffer.
Buffer Group
The buffers in LightWave 3D 2018 are set up in groups. Selecting one of them will show a different set of buffers in the following pop-up control.
The following buffer groups are available by default:
- (standard) This is a group of the basic buffers the renderer produces.
- (extra) These are mainly shading and volumetric related buffers created by the renderer.
- (custom) Any custom AOVs added by the user.
Light buffer groups will show up in this pop-up as well.
Buffer
 This pop-up displays all buffers currently available to exrTrader via the Lightwave3D SDK.
Buffers that are enabled for export have a check mark in front of them, Buffers that are written to a single file have the text “(image)” behind them.
A list of buffers is available in the appendices.
Enabled
This check box enables the buffer for saving.
Layer Name
This is the base name for the current buffer.
If the buffer is saved as a channel in the main output file, the channels will include this base name as a prefix, i.e. “Specular.Red”.
If the buffer is saved as a single image file, the base name will be a part of the image file name as explained in the Single File Naming section.
Description
A short description of the currently selected buffer is displayed here.
Quick Buffer Enable
This pop-up allows you to quickly enable/disable some of the more commonly used buffers as well as enable/disable/toggle all buffers or all buffers within the current group.
Individual Settings for Buffers
The following settings are per buffer, and define how a buffer will be processed by exrTrader.
These are organized into tabs: Saving, Processing, Channels and LW Options.
Here you can also name the buffers, specify their pixel type and save them as single image files.
Saving

Save as
Due to popular demand we've extended the ability to save a buffer as a separate image. A buffer can now be saved as a separate image of any type supported by LightWave 3D, as well as being a part of the main OpenEXR image.
| Layer | This option will save the current buffer only as a layer in the main OpenEXR image file. |
|---|---|
| Layer and Image | This option will save the current buffer as a layer in the current OpenEXR image file and as a separate image file. The file format for the separate file is determined by the File Format option. |
| Layer and Image+Alpha | This option will save the current buffer as a layer in the current OpenEXR image file and as a separate image file including the alpha channel. The file format for the separate file is determined by the File Format option. |
| Image | This option will only save the current buffer as a separate image file. The file format for the separate file is determined by the File Format option. |
| Image+Alpha | This option will only save the current buffer as a separate image file, including the alpha channel. The file format for the separate file is determined by the File Format option. |
File Format
This pop-up allows you to select the file format used when saving the current buffer as a separate Image (as determined by the Save as option).
The (native OpenEXR) saver uses the settings for the main OpenEXR file (such as the compression settings) and uses an internal saver as opposed to using the LightWave 3D image plugins.
Please note that the (native OpenEXR) saver will not save the additional Alpha channel if you select any of the Image+Alpha options.
Output Colour Space
This pop-up allows you to select which colour space the buffer should be converted to prior to saving it as a separate image.
This does not affect the layer as saved in the main OpenEXR image and it is also not available for saving using the native EXR saver.
Default uses the Output Colour Space as defined in the LightWave preferences.
Currently LUTs can not be loaded directly using this pop-up control due to SDK limitations. You can however designate a LUT as the default Output Colour Space in the LightWave preferences.
Save Luminance as RGB
This option is only available when “Save as Single Image File” is activated.
By default exrTrader saves single channel OpenEXR images with a channel names “Y”. As defined in the OpenEXR specifications this is a luminance channel that should be interpreted as greyscale data by reading applications.
Unfortunately this isn't the case, some applications do not handle Y channel only images (or don't handle them well). This option will save the greyscale data as RGB data instead.
This increases the size of the image threefold, but also maximizes compatibility.
OpenEXR Pixel Type
This option allows you to define how the pixels of the current buffer will be saved in the OpenEXR file. OpenEXR allows for all pixel types to co-exist in a single image file.
The Float pixel types allow for HDR buffers to be stored.
Integer is currently of little use with the available buffers. It is designed to be used with precise, discrete values such as object or surface Ids.
We recommend to use 16bit Float for all buffers, except for the Depth buffer which profits greatly from saving it at 32bit Float.
For more colour precision in compositing you can always switch buffers to 32bit float.
Fit Data Window
 This option shrinks the data window of the layer to only encompass pixels that actually contain values within the layer.
OpenEXR images use the data window to define a rectangle that actually contains pixel values. This may be smaller than the actual size of the image.
This is basically like saving a limited region of the final image, but computed again every time an image is saved.
If this option is off, then the current layer is not used to compute the data window.
If it is on, then the smallest data window for the current layer is computed. If a multi-layer OpenEXR image is saved, then the data windows of all layers as well as the current limited region settings are used to compute an optimal data window for the image.
If the native OpenEXR saver is used to save the current layer as a separate image, then the data window for the current layer is taken into account as well. All other image savers ignore it.
This option only slows down saving a little, but can speed up loading the saved OpenEXR files in compositing applications a lot.
Fit Data Window is disabled by default as some applications (notably Photoshop and After Effects) don't load images with a data window properly (they only load an image as large as the data window itself).
If you use a compositing application that supports OpenEXR data windows (such as Fusion6, Shake or Nuke), we recommend you to enable the data window for all buffers once and save the setting as a default preset.
Processing
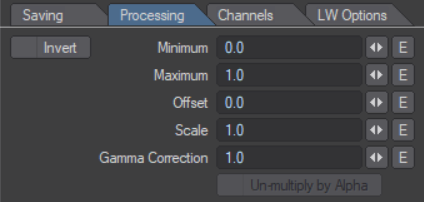
Invert
This option will invert the current buffer.
Minimum / Maximum
These two options allow you to change the range of the data saved in the buffer. For most buffers, the Minimum and the Maximum define the range of values written out that correspond to the range of 0 .. 1.0 the the buffer as passed by LW (or “raw” buffer). For the Depth buffer, these are handled differently, the Minimum and Maximum define the distances in metres from the camera that correspond to the 0 .. 1.0 range in the written buffer. Expressed mathematically:
output = Minimum + buffer * (Maximum – Minimum) for all a buffers except Depth
output = (buffer – Minimum) / (Maximum – Minimum) for the Depth buffer
Offset / Scale
Offset and Scale allow further tweaking of the buffer values. Offset is just added to the buffer values, Scale scales the range of values in the buffer by the entered amount. The Offset is applied before the Scale.
Gamma Correction
This setting allows you to apply a gamma value to a buffer.
To remove gamma applied to the buffer, enter “1/gamma_value”. As an example: 1 / 2.4 = .4167 removes a gamma of 2.4 from the buffer.
Un-multiply by Alpha
This option un-multiplies the current buffer by the alpha channel. This setting is needed for compositing applications that don't support the additive merging of images.
This option is only available for buffers that contain three channels.
Channels

Channel / Channel Name
Since OpenEXR allows for the naming of every channel saved in the file, you can use the Channel control to pick a channel, and Channel Name to give it a new name.
Channels can be renamed for single channel buffers as well. This was implemented to increase compatibility with Nuke, which expects single channels to be named “A” (mask/alpha) as opposed to “Y” (luminance).
Flip
This is a per channel setting. It will flip the values within the channel around the 0 value. This is different from inverting a channel.
This is designed to flip the X/Y motion channels to match the expectations of different compositing applications.
LW Options
 These options allow you to edit the per buffer settings that LightWave provides in the Render Properties/Buffers tab.
These settings are saved by LightWave with the scene and are provided here as well for convenience.
Adaptive Sample
This determines if the buffer is used by adaptive sampling to check if a pixel needs more samples. This is done by comparing the pixel values in the buffers using the Adaptive Sampling Threshold set in the Camera Properties.
Noise Filtering
This will allow the noise filtering in LW to affect this buffer as well. Noise Filtering has to be active in the Render Properties/Render tab as well.
Reconstruction Filter
This allows you to pick a different reconstruction filter on a per buffer basis.