Table of Contents
Installation and Licensing
Installation
Download and extract the appropriate ZIP file for your plugin.
The paths to install the plugins to depends on the version of LightWave 3D. These instructions assume that LightWave 2018.0.5 is installed.
Make sure to install the version of the plugin file that matches your LightWave 3D installation. 2018 is designed to be used in LightWave 3D 2018 and 2019, 2020 is designed for LightWave 3D 2020.
Windows
The <plugin>.p file can be copied to any directory where you keep your plugins. We recommend using a manually created plugin directory to separate third party plugins from plugins shipped with LightWave 3D. This will simplify upgrades of LightWave 3D.
Now use the Edit Plug-ins panel (alt-F11) of the Add Plugins menu item to add the plugin file <plugin>.p to LightWave 3D.
You can also copy it to
%userprofile%.NewTek\LightWave\####\plugins
(#### is the version number of your LightWave 3D installation) to allow LightWave to detect the plugin automatically.
MacOS
You can copy the <plugin>.plugin file into one of two locations for LightWave to use it automatically.
You can either copy it to:
~/Library/Application Support/Newtek/LightWave####/Plugins
for the current user or
/Library/Application Support/Newtek/LightWave####/Plugins
for all users. (#### is the version number of your LightWave 3D installation)
In both cases LightWave 3D will automatically pick up the plugins once you launch it.
You are of course free to copy the plugin file to another location and use the Edit Plug-ins panel (alt-F11) of the Add Plugins menu item to add the plugin file <plugin>.plugin to LightWave 3D.
macOS Catalina and higher
Since macOS Catalina, plugins need to be signed by the developer. This affects all existing plugins. We will try to make it possible to sign plugins in the future though.
To allow macOS to run unsigned plugins, please use the following steps:
 Before adding plugins manually, open macOS's System Preferences/Security & Privacy alongside. If you use our recommended method to let LightWave 3D scan for plugins automatically, launch Security & Privacy before launching LightWave 3D.
- Scan the directory or launch LightWave 3D if you copied the plugin to one of the recommended directories.
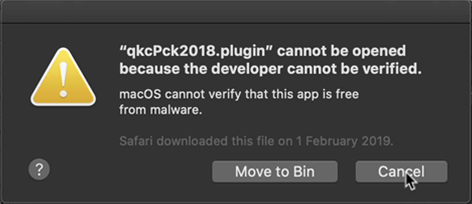 When an un-signed plugin is detected you will see a warning. Click Cancel.
 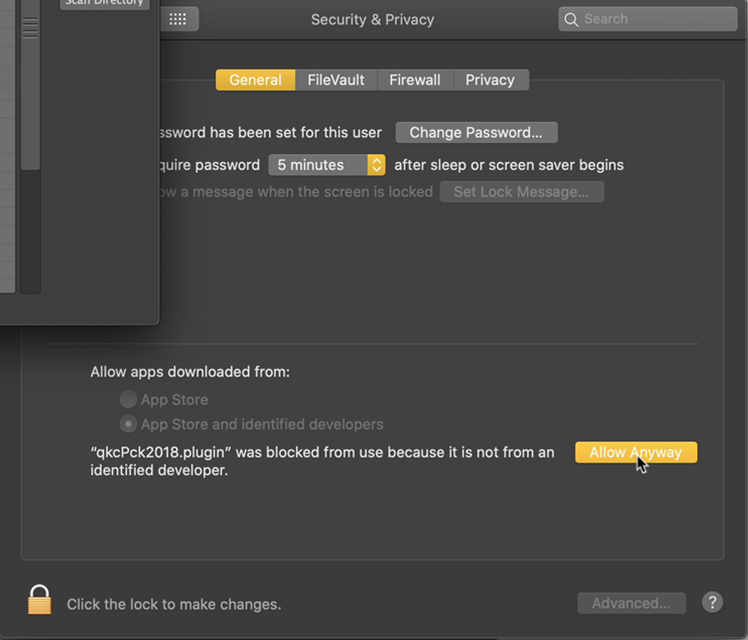 Immediately after clicking cancel, you will see the plugin popup in the Security & Privacy pane. Click Allow Anyway.
During the scanning directory phase you may have to jump between the Cancel and Allow Anyway process a few times depending on how many unsigned plugins you have.- Some plugins may also require you to Open them. Continue until everything is scanned. You shouldn’t have to go through this again!


Licensing
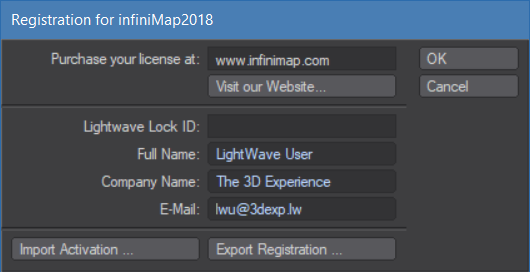
Once you've installed the plugin, open any instance of the plugin 1). The user interface controls will be disabled except for a button asking you to register.
Clicking on the button will open the Registration panel as shown on the left.
Enter your full name, company name (if applicable) and e-mail address.
Export the registration and attach it to an e-mail to registration@db-w.com. We will mail you an activation code within 24 hours 2) after payment is received, depending on the time difference.
You can now import the keyfile and press OK to complete the licensing process. You may need to remove the plugin from the scene and re-add it to reset the user interface 3).
The registration file is stored in %appdata%\db&w\licenses on Windows, ~/Library/Application Support/db&w/licenses on MacOS. If you use multiple licenses of LightWave 3D from a single network share, the registration manager will only append/edit licenses locked to the dongle installed on the host machine.
It will manage multiple licenses allowing for a single registration file on your network share.
Updating licenses
Some of our plugins have different activation levels. For example, infiniMap is available as infiniMap Exr and as infiniMap Pro.
Unfortunately there is no built-in mechanism to upgrade a license. To upgrade, you will need to deleted the existing license manually and then re-register using the new license.
The licenses are stored in %appdata%db&w\licenses on Windows, ~/Library/Application Support/db&w/licenses on MacOS and are named according to the plugin name with a file extension of .key