This is an old revision of the document!
Table of Contents
Multi-Image Sampler (Preliminary)
This node allows the user to use select one of a list of images dynamically for texturing. One example would be to use an instance ID to randomly texture instances given a list of images.
Controls
Background Colour / Blend Mode / Opacity
The three controls define how the texture is composited. They are identical to the controls found in the native texturing nodes.
Index
This defines which of the images in the list is being used to compute the output colour. Usually the index is driven by a value connected to the nodal index input.
Interpolate
If enabled, indices that result in a value between two images will not pick the first respective image, but interpolate between this and the next image.
Relative / Absolute
This defines how the Index is interpreted.
- Relative The index should be between 0.0 and 1.0 which will correspond to the start and the end of the image list. This is irrespective of the amount of images in the list.
- Absolute The index number will be taken as is. I.e. if the index number is 5, the 6th image in the list will be used (this is because the index is 0 based. I.e. is the index is 0, the first image is used).
Pre Behaviour
This defines how the index is interpreted if it's below zero.
- Blank The output will be blank.
- Repeat The list of images will be repeated
- Mirror The list of images will be mirrored
- Hold The first image in the list will be used
Post Behaviour
This defines how the index is interpreted if it's above 1 or above the number of images in the list (Depending on the Relative/Absolute switch).
- Blank The output will be blank.
- Repeat The list of images will be repeated
- Mirror The list of images will be mirrored
- Hold The last image in the list will be used
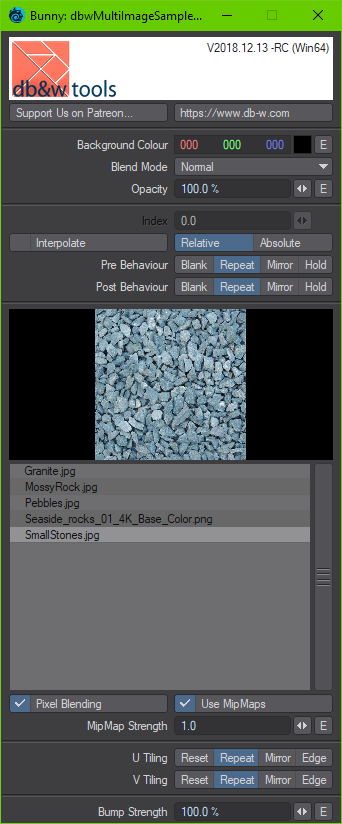
Image Preview
This displays the image currently selected in the list below.
Image List
This control displays a list of all images used by the node. The top most images has the lowest index (0).
Selecting an image will display it in the preview control.
All other interactions are via two pop-up menus. One is launched by double clicking on an image entry, the other by right clicking anywhere on the control:
LMB double-click menu
This allows you to change the select image to another loaded image, load a new image and select it or change it to (none) - which will treat the list entry as being black with no alpha when rendering.
RMB Menu
 This menu can be launch by right clicking anywhere on the list control. Some of the options will only be available if an image is selected in the list.
Move Up
If an image is selected - and isn't the first image in the list already - it will move up by one entry in the list.
Move Down
If an image is selected - and isn't the last image in the list already - it will move down by one entry in the list.
Add Image...
This will add a new image to the list. If an image is selected, the new image will be added below the selected image, otherwise at the end of the list.
Load Image(s)...
This allows the user to load multiple images from disk. These will be added below the currently selected image or at the end of the list.
Images that are loaded into LightWave 3D already will not be loaded again.
Remove Image
This removes the currently selected image from the list.
Clear all Images
This clears the list of images.
Pixel Blending / Use MipMaps / MipMap Strength
These controls correspond to the identical controls in the native image sampler or image texturing nodes.
U Tiling / V Tiling
Bump Strength
Node Connections
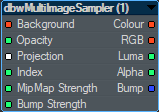
Inputs
Background
Opacity
Projection *
Index
MipMap Strength
Bump Strength
Outputs
Colour
RGB
Luma
Alpha
Bump
 This is the plugin of the month for December 2018, made possible by the finest patrons on Patreon.
We'd like to thank Antti Järvelä from the LightWave 3D Group in helping us figure out the specifics of the bump mapping code in LightWave 3D.