This is an old revision of the document!
Table of Contents
PBR Texture Set (WiP)
The PBR Texture Set node is designed as a one stop solution for using a set of PBR textures. It supports both the Metallic and Specular PBR workflows and even converts between both of them if required.
When used with the native Principled BSDF material, a Metallic workflow is preferred.
The node uses a single Projection connected to it for all the images it manages.
If no Projection is connected to the node, it will used the default UVs.
There's also an option to use the built-in triplanar mapping, allowing for quick texturing of generic meshes.
Controls
Presets
This pop-up allows you to save, load and manage presets of the node settings. This allows you to re-use PBR texture sets.
Textures
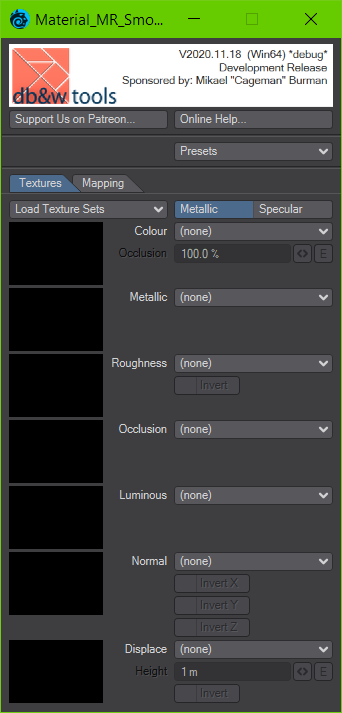
Load Texture Sets
This pop-up allows for the simple loading of PBR texture sets from files, using file name matching to autmatically assign them to texture slots.
Load Textures...
This opens a file requester which has two modes of operation:
- If only one image is selected, the node will try to determine the base name of the file and then scans the location of the image for other files with the same base names. These will then be loaded and matched to the texture slots.
This allows you to load a complete set of PBR textures by only selecting one file. - If more than one image is selected, the node will just try to load and match them to the texture slots.
Load Textures… will only load images into empty texture slots, unless Clear before Loading is enabled in the Settings.
Clear all Textures
Clears all texture slots.
Configure
This opens the settings window which allows you to change how the plugin will use the image file names to determine which texture slots they should be assigned to.
The settings are saved in the settings folder of the current LightWave 3D installation - not with the plugin itself. To manage multiple naming conventions, these settings can be saved as presets.
- Clear before Loading When enabled, all texture slots in the node will be cleared before a new set is loaded using Load Textures…
If it is disabled, new images will only be loaded in empty slots. - Presets Allows you to load, save and manage the presets for the file name detection.
- Filename Base Separators Here you can add multiple characters that may serve as separators of the base file name to modifiers, which could include the pbr texture channel name, image numbers or UDIM numbers.
- Colour / Diffuse, Metallic, Roughness, etc. These determine file name fragments the plugin will look for to assign images to PBR texture slots. Multiple fragments may be separated by a semicolon (;).
The plugin will remove the base file name (if possible) before trying to match the fragments. If an images matches multiple fragments then it may be assigned to multiple slots.
Metallic / Specular
This determines if the current loaded textures conform to the Metallic or Specular PBR workflow. Node outputs will be converted as required.
If Metallic is enabled, the Metallic and Roughness textures will be visible. The Colour texture will be interpreted as Base Colour.
If Specular is enabled, the Specular and Roughness textures will be visible. The Colour texture will be interpreted as Diffuse Colour.
Below this you will find a section of pop-ups to select images for the individual channels of a PBR texture set as well as related controls.
Unfortunately the node can't set the colour spaces for the individual images. We've included the recommended settings in <angled brackets>.
Colour <sRGB>
The base colour for metallic texture sets or the albedo/diffuse colour for specular texture sets. The alpha channel of this image is available as the Transparency output.
Metallic (Metallic mode only) <linear>
The metallness of the surface. This is a greyscale / scalar value. To allow for the use of a single image as an ORM (Occlusion, Roughness, Metallness) map, only the blue channel of the image is used (and displayed in the thumbnail).
Roughness (Metallic mode only) <linear>
The roughness of the surface. This is a greyscale / scalar value. To allow for the use of a single image as an ORM (Occlusion, Roughness, Metallness) map, only the green channel of the image is used (and displayed in the thumbnail).
Specular (Specular mode only) <sRGB>
Glossiness (Specular mode only) <linear>
Occlusion <linear>
This is used by all PBR workflows. This is a greyscale / scalar value. To allow for the use of a single image as an ORM (Occlusion, Roughness, Metallness) map, only the red channel of the image is used (and displayed in the thumbnail). This image can be multiplied into the proper texture channels within the node but is also available as an node output.
Luminous <sRGB>
Normal <linear>
Displace <linear>
This is an optional displacement/height map which can also be used to compute a bump map.
Mapping
The top part of this tab controls how the image maps are sampled by the node. These settings are identical to those used by the native 2D Image node or the native Image Sampler node.
Triplanar Mapping
Triplanar mapping is a type of cubic texture mapping with edge blending.
Please have a look at the Triplanar Mapper for a more elaborate explanation.
Use Triplanar Mapping
Activating this toggle enables Triplanar mapping, overring the Projection input and the use of the default UVs. It also enables the controls below used to control the mapping.
Controls not described here work identically to those used by the native 2D Image node.
Triplanar Blend
This controls how hard/soft the blend of the planar projections is as the normals point away from the major axes.
 |  | 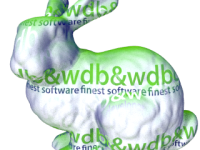 | 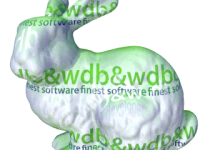 |
| 0% Blend | 20% Blend | 50% Blend | 100% Blend |
We recommend a value between 5% and 20% for most uses.
World/Deformed Coords
This controls if the blending is computed in local or in world space. Please note, this only affects how the blending is computed, not how the images are projected.
UV Tiles
Flip Reverse Side
If this option is enabled, the projected image will be flipped on the U texture coordinate axis on the negative side of the projection. This can be used to make images containing text be readable on the back side of a mesh as well.
UV Offset
Adds an offset to the computed UV coordinates. This can even be used to animate a texture across a surface.
Node Connections
Inputs
Projection
MipMap Strength
The following inputs are only used if Triplanar Mapping is enabled.
Triplanar Blend
Position
Rotation
Scale
Normal
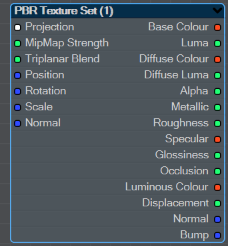
Outputs
Most of the outputs correspond directly to a mapped image texture. Depending on the PBR mode of the node, some of these may be converted/synthesised from the loaded images.
For example, if a texture set using a Metallic workflow is loaded, the Specular and Glossiness outputs will be synthesised. Likewise, using a Specular workflow, the Metallic and Roughness outputs will be synthesised.
The brackets behind the outputs describe the native workflow for the outputs, the others are shared between both types of texturing workflows.
Base Colour (Metallic)
Base Luma (Metallic)
Diffuse Colour (Specular)
Diffuse Luma (Specular)
Transparency
This is derived from the alpha channel of the colour image.
Metallic (Metallic)
Roughness (Metallic)
Specular (Specular)
Glossiness (Specular)
Occlusion
Luminous Colour
Displacement
The displacement away from the surface, optionally multiplied.
Normal
Bump
The bump map which is computed from a displacement map if one is present in the texture set.
 This is the plugin of the month for November 2020, made possible by the finest patrons on Patreon.
We'd like to thank Antti Järvelä from the LightWave 3D Group in helping us figure out the specifics of the bump mapping code in LightWave 3D.

